

Choosing the right seat for your vehicle is more than just a matter of comfort; it’s about personalizing your driving experience. Custom seat options allow you to tailor not only the aesthetics but also the functionality of your seating. Whether you are seeking increased support, specific materials, or unique designs, understanding what custom seats are available can significantly enhance your ride.
In this guide, we will delve into the various custom seat options that cater to different needs and preferences. From sporty bucket seats to luxurious recliners, the market offers a plethora of choices. We will discuss the benefits of upgrading your seats and the different materials, styles, and features to consider when selecting your custom seats.
Moreover, installing custom seats can be a straightforward process if you have the right guidance. This article will provide a comprehensive installation guide, ensuring that you can successfully replace your factory seats with your newly chosen custom options. By following these steps, you will not only improve your car’s interior aesthetics but also enhance your overall driving experience.
Choosing the Right Upholstery Material for Custom Seats
When designing custom seats, selecting the appropriate upholstery material is crucial for both aesthetics and functionality. The right fabric not only enhances the visual appeal but also impacts durability, comfort, and maintenance of the seats.
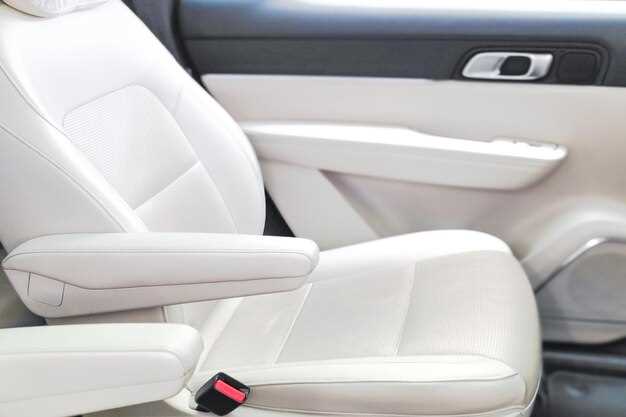
Leather is a popular choice for its luxurious look and longevity. It is easy to clean and resistant to wear; however, it may require conditioning to maintain its suppleness over time. In addition, leather can be more expensive than other materials, making it a premium option for custom seating.
Fabric, on the other hand, offers a wide range of textures, patterns, and colors, allowing for creative expression in custom seat design. Fabrics like cotton, polyester, and blends provide comfort but may be less durable than leather. Additionally, consider the fabric’s resistance to stains and fading, especially in high-traffic areas.
Vinyl is a synthetic alternative that mimics the appearance of leather. It is water-resistant, easy to clean, and typically more affordable, making it suitable for custom seats in various environments, such as outdoor furniture or family cars. However, it may not provide the same level of comfort as natural materials.
Another factor to consider is breathability. Materials with good airflow will enhance comfort, particularly in climates with high temperatures. Look for fabrics designed with ventilation features or those made from natural fibers, which can wick away moisture.
Finally, it’s essential to consider your lifestyle and usage patterns when choosing upholstery. For instance, if you have pets or children, a more durable and stain-resistant fabric would be beneficial for custom seats. Assessing these aspects will help ensure that your custom seats meet your specific needs and maintain their appeal over time.
Step-by-Step Process for Installing Custom Seats in Your Vehicle

Installing custom seats can significantly enhance both the comfort and aesthetics of your vehicle’s interior. Follow this detailed guide to ensure a successful upgrade.
1. Gather Necessary Tools and Materials
Before starting, collect all necessary tools: a socket wrench set, screwdrivers, pliers, a utility knife, and a measuring tape. Additionally, acquire custom upholstery, seat brackets, and any specific hardware recommended by the seat manufacturer.
2. Remove Existing Seats
Start by disengaging the battery to prevent any electrical issues. Locate the seat bolts underneath the existing seats and use your socket wrench to remove them. Carefully unplug any electrical connections, especially for heated seats or built-in sensors. Once disconnected, lift out the old seats and set them aside.
3. Prepare the New Custom Seats
Inspect your new custom seats and ensure that all upholstery is intact and free from defects. If your seats come with brackets, attach them securely according to the manufacturer’s instructions. Ensure that any provided upholstery attachments are properly aligned and ready for installation.
4. Position the New Seats
Place the custom seats into the vehicle, aligning them with the pre-drilled holes in the floor. Take extra care to ensure that the seats are straight and centered within the vehicle’s cabin. Use your measuring tape to confirm the proper placement if necessary.
5. Secure the Seats
Using the previously removed bolts or the hardware provided, secure the custom seats in place. Tighten each bolt evenly to distribute pressure and prevent instability. If your seats have an electrical connection, plug them in accordingly before finalizing the installation.
6. Test the Installation
Once installed, gently shake the seats to check for movement. Adjust the seating position and test any mechanical features such as recline or height adjustment. Make sure everything functions correctly and fits snugly.
7. Finalize and Clean Up
Reconnect the vehicle’s battery and check the electrical connections again. Ensure that any excess upholstery material is neatly tucked away or trimmed as necessary. Clean the surrounding area to remove any debris generated during the installation.
8. Enjoy Your Custom Seats
Your custom seats are now installed! Take a moment to appreciate the new look and feel of your vehicle’s interior. Enjoy the comfort and style that custom upholstery brings to your driving experience.
Common Challenges in Upholstery and How to Overcome Them
Upholstery is a crucial aspect of any custom seat project, but it often comes with a set of challenges that can hinder the desired outcome. Addressing these issues effectively can ensure a high-quality finish.
One of the most common challenges is selecting the right fabric. With a wide variety of materials available, it can be difficult to choose one that balances aesthetics, durability, and maintenance. To overcome this challenge, conduct thorough research on different upholstery fabrics. Consider factors such as wear resistance, ease of cleaning, and suitability for the intended use of the seat. Sample swatches before making a final decision can also help visualize the finished product.
Another challenge is achieving a smooth and wrinkle-free finish. Improper stretching or tacking of the fabric can lead to unsightly creases. To prevent this, always work with a clean and well-prepared frame. Begin by measuring accurately and cutting the fabric with a slight excess. Utilize techniques like pulling the fabric taut evenly and securing it with staples in a systematic manner to ensure an even application.
Seam alignment is another potential issue that can impact the appearance of the upholstery. Misaligned seams can detract from a polished look. To avoid this, use a sewing machine with accurate guides and take your time to pin everything in place before sewing. Regularly check the alignment throughout the process to catch any discrepancies early.
Padding and cushioning pose additional challenges in achieving comfort and support in the seat. Selecting the right thickness and type of foam can be tricky. To resolve this, test different foam densities to find the ideal balance between softness and support based on how the seat will be used. Layering foams can also enhance comfort and durability.
Lastly, ensuring proper installation can be a daunting task, particularly for DIY enthusiasts. Incorrect installation can lead to a compromised structure and appearance. To mitigate this, prepare by following a comprehensive installation guide, breaking the process into manageable steps, and possibly seeking assistance from experienced upholsterers when necessary.
By acknowledging these common challenges in upholstery and implementing effective strategies, you can achieve a beautifully upholstered seat that meets both functional and aesthetic needs.